

Prepare the page, recipient and test
A useful contact form lets two things happen. The visitor can send a request, and the person responsible for replying receives it with a usable return address. This guide creates a form using WPForms Lite’s free template, embeds it in a WordPress page and checks both results by opening the page as a logged-out visitor. Screenshots come from a French-language WordPress 7.1.4 installation running WPForms Lite 2.0.4. The example.test or example.net addresses and messages visible in the screenshots are fictional.
Start on a copy or test page, particularly if your site already displays a contact form. Record the address where the team should receive requests and choose a monitored inbox. Prepare another address you control to play the visitor’s role in the test. This lets you check the difference between the form recipient and the address a reply will go to. If you only test on your own machine, connect a local capture inbox suited to your development environment.
Three fields are enough for this first form. Ask for a name, email address and message. The name identifies the request, the address enables a reply and the message explains the need. If your team can reply without knowing the name, you can make it optional in the field settings. Keep an identifiable request for testing, such as “Test contact BPC-01.” This reference lets you match what you entered with the message received.
Install and activate the free version
Sign in to administration with an account authorized to install plugins. Open Plugins, then Add New Plugin. If your WordPress can access the directory, search for WPForms and open the free plugin’s listing. Check the publisher name, WPForms or Syed Balkhi depending on the screen, and the directory identifier, wpforms-lite. Click Install Now, then Activate. Return to installed plugins. The Deactivate link in the WPForms row confirms activation.
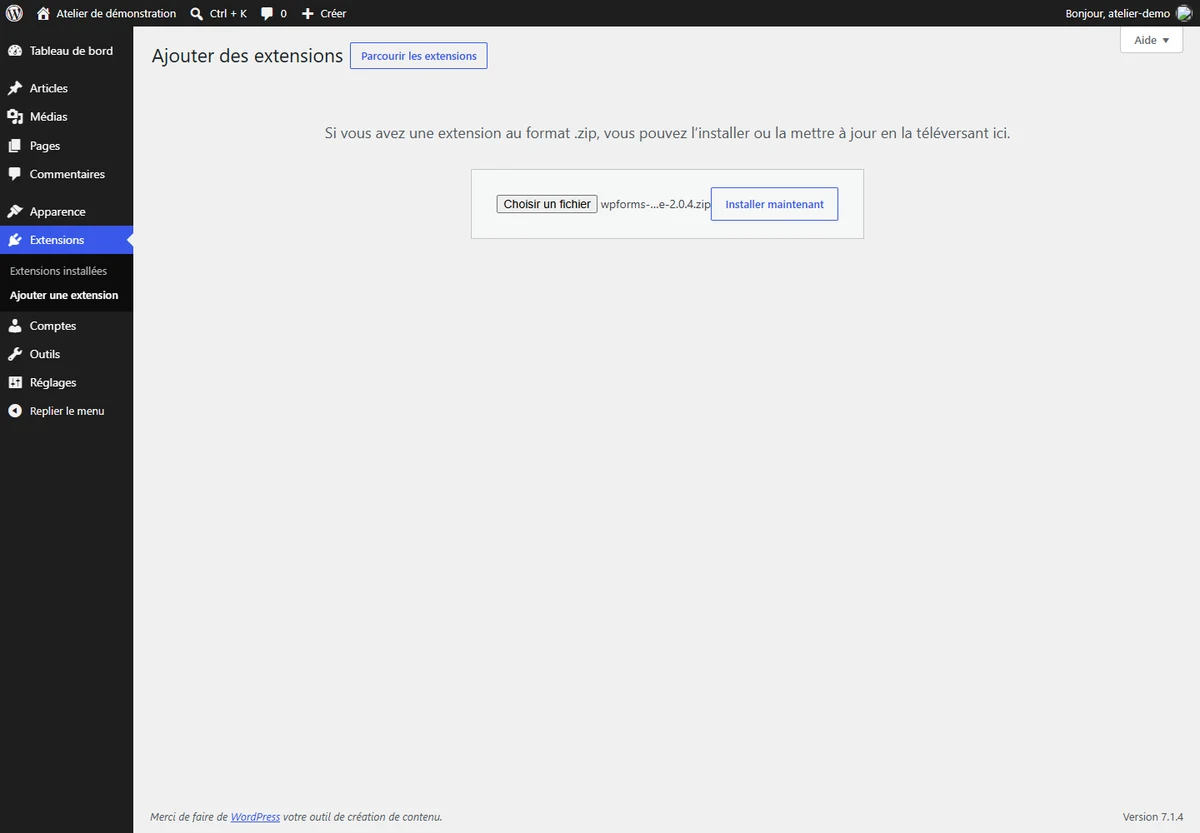
You can also download the ZIP from the official WordPress.org listing and use Upload Plugin. This approach is useful for installing the same file on an isolated copy or when your host asks you to upload the archive. Choose the original ZIP, run the installation and activate the plugin. This guide’s screenshot follows that route using the official version 2.0.4 archive. If WordPress rejects a large file, record the message and displayed upload limit. Direct installation from the directory remains possible on a WordPress installation with access to it.
Once the plugin is active, find WPForms in the administration menu. If some labels appear in English, check the site language under Settings → General and your profile language. WordPress can use a different language for the signed-in account. In an offline local environment, the French language pack must have been downloaded and placed with the other translations. Field labels entered in the form remain editable content. Review them even if the builder interface is in French.
Choose the Simple Contact Form template
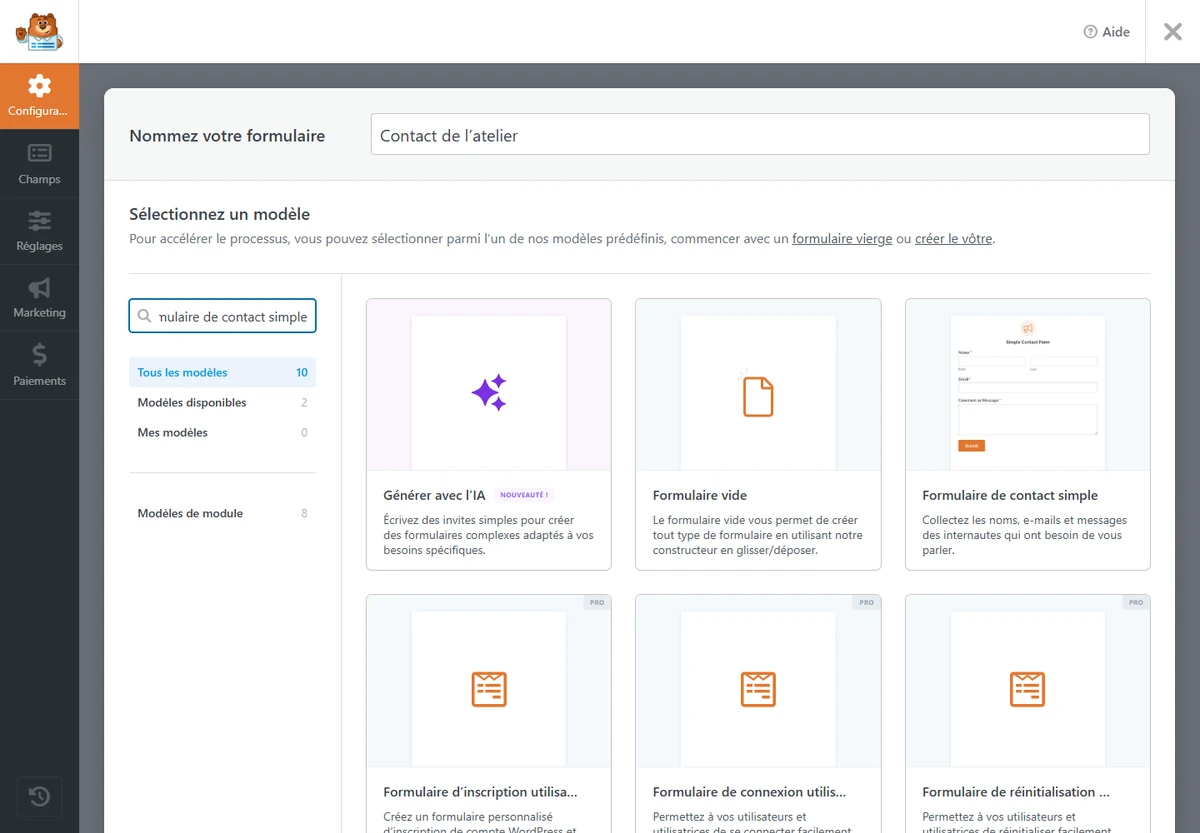
In the WPForms menu, open Add New Form. Depending on the language pack, the submenu may display Add New Form. Give the form a recognizable name, such as “Contact de l’atelier.” This name helps you select it when adding it to a page. If several teams manage forms, choose a name that also indicates its purpose. A form named “Contact général” is easier to distinguish from a quote request or appointment booking.
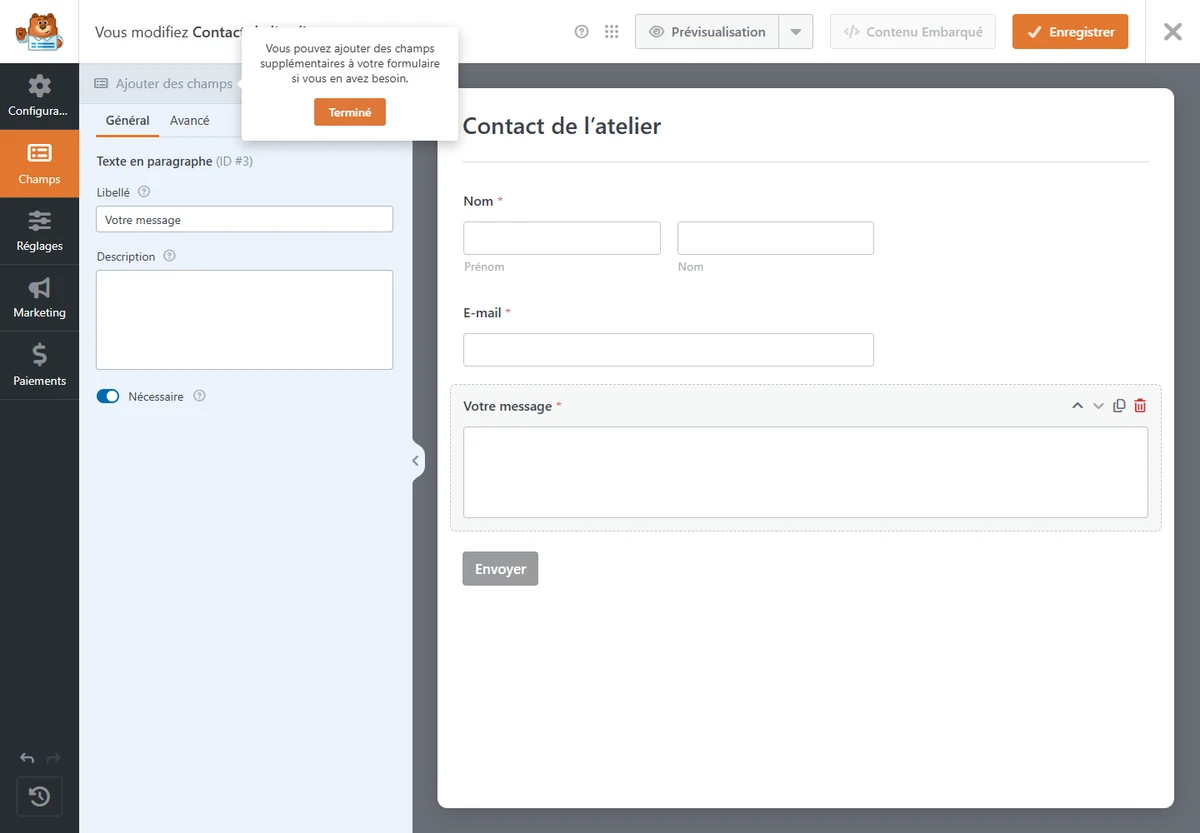
Find Simple Contact Form among the templates and use it. The builder displays the template’s fields in the central area. Click a field to see its options. Check that the email address and message are required. Check this explicitly: the template’s long-text field may be optional. Click “Comment or Message,” change its label to “Votre message” and enable Required in its options. Give every field a visible label. An example displayed inside a field disappears as soon as the visitor starts typing and does not replace the label.
Save the form, then record its name in the WPForms list. A form saved in the builder exists even if no page displays it yet. If you try several templates, delete only test forms you have confirmed are not embedded anywhere. When modifying a version already in use, identify every page displaying it before saving. Changes to the same form may appear everywhere it is embedded.
Configure the notification to receive the message
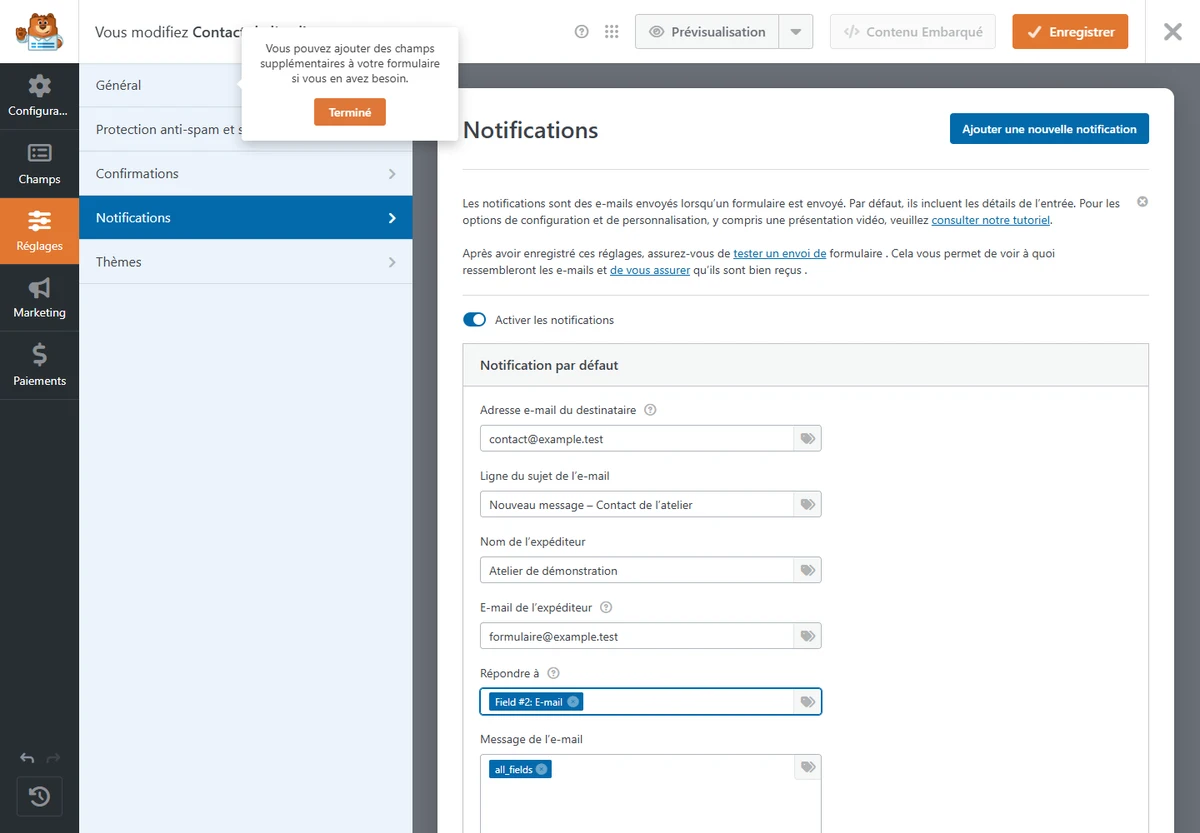
In the builder, open Settings → Notifications. Check that the notification is enabled. The destination address is often prefilled with a tag using the site’s administration email. If requests should go to another inbox, enter the intended address. In our local test, the recipient is contact@example.test. On your site, replace it with your team’s inbox. Specify an identifiable subject such as “Nouveau message — Contact de l’atelier” to make searching and sorting easier.
The sender address and reply address have separate purposes. Use a sender address authorized by the service sending your site’s emails. Fill Reply-To using the dynamic tag for the visitor’s Email field. Check whether the template has already selected the Email field in Reply-To. If the tag is missing or points to another field, open the tag menu and select the visitor-entered address. When clicking Reply after receipt, the team should see the address entered in the form. If the relay enforces a sender, WordPress mail configuration or an SMTP plugin may override the value entered in WPForms.
Keep the field summary in the notification body. The template may use the {all_fields} tag, which groups the values. Test what it produces with the three fields. Save the form after configuring it. Recipient, subject and reply tag are the three points to record before testing. If you later change the order or replace an email field, return to check that the reply tag still targets the intended field.
Customize the confirmation displayed to the visitor
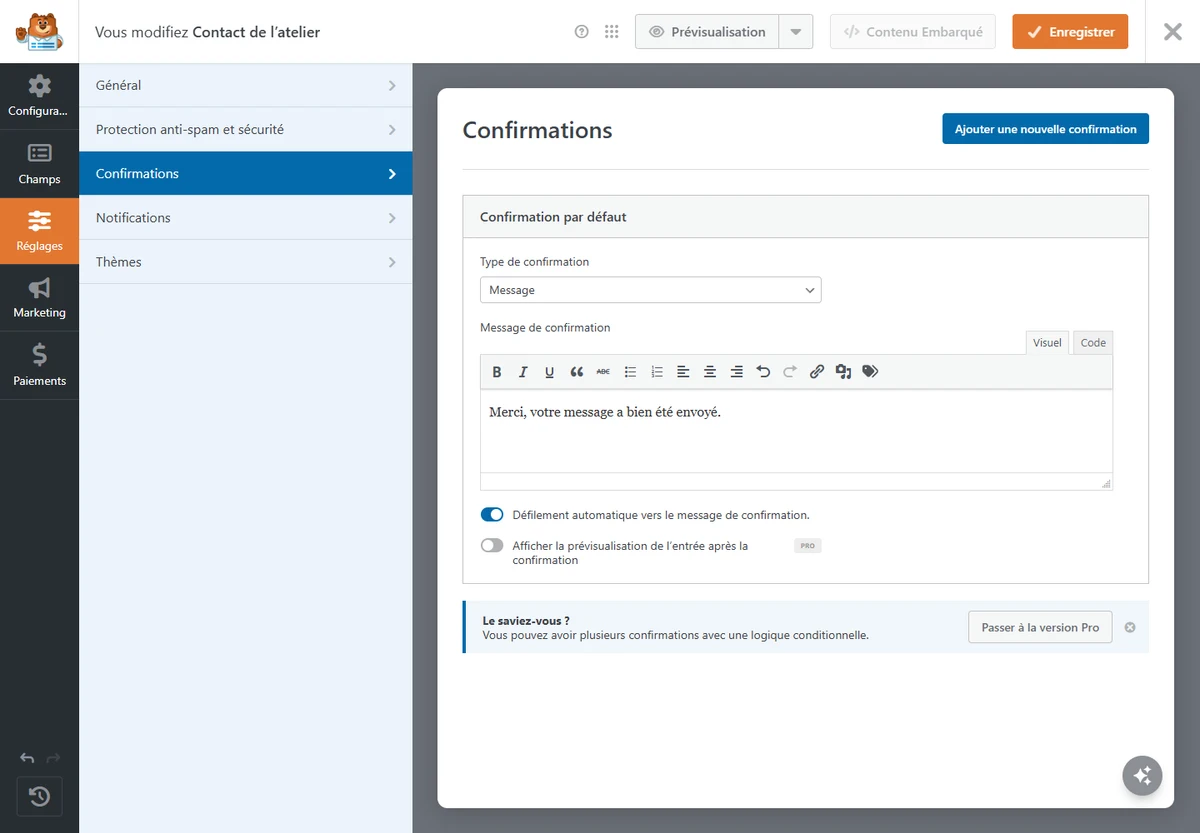
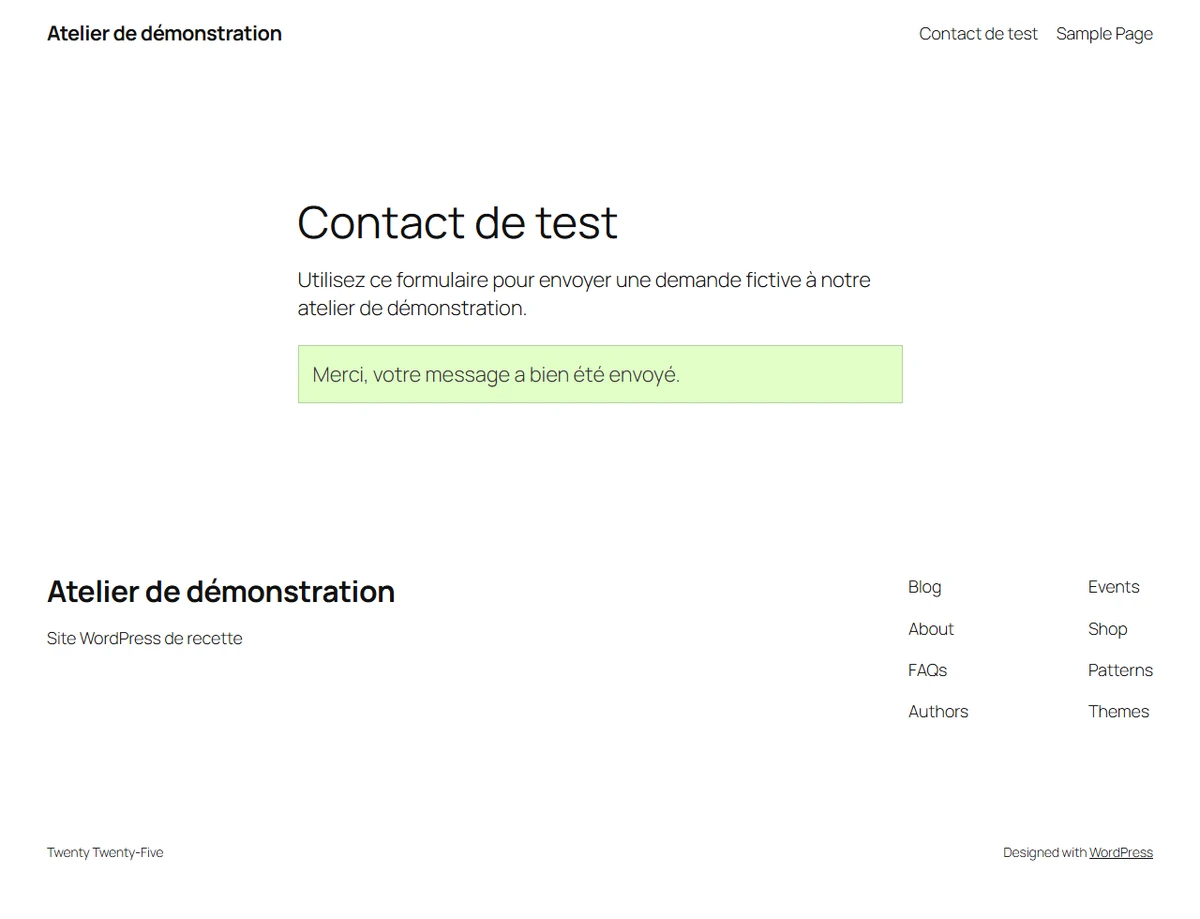
Under Settings → Confirmations, keep the Message type for this first form. Write a short, clear response, such as “Merci, votre message a bien été envoyé.” If you want to state a response time, choose a commitment your team can meet. Save. This confirmation appears after the form is processed. It lets the visitor know the page has acknowledged the submission.
The displayed message and received email are two separate checks. The first happens on the contact page after clicking Submit. The second happens in the recipient’s inbox, or capture inbox for local testing. You may pass the first check and still have an email transport problem. Keep the test reference in the entered text and search for it in the received message.
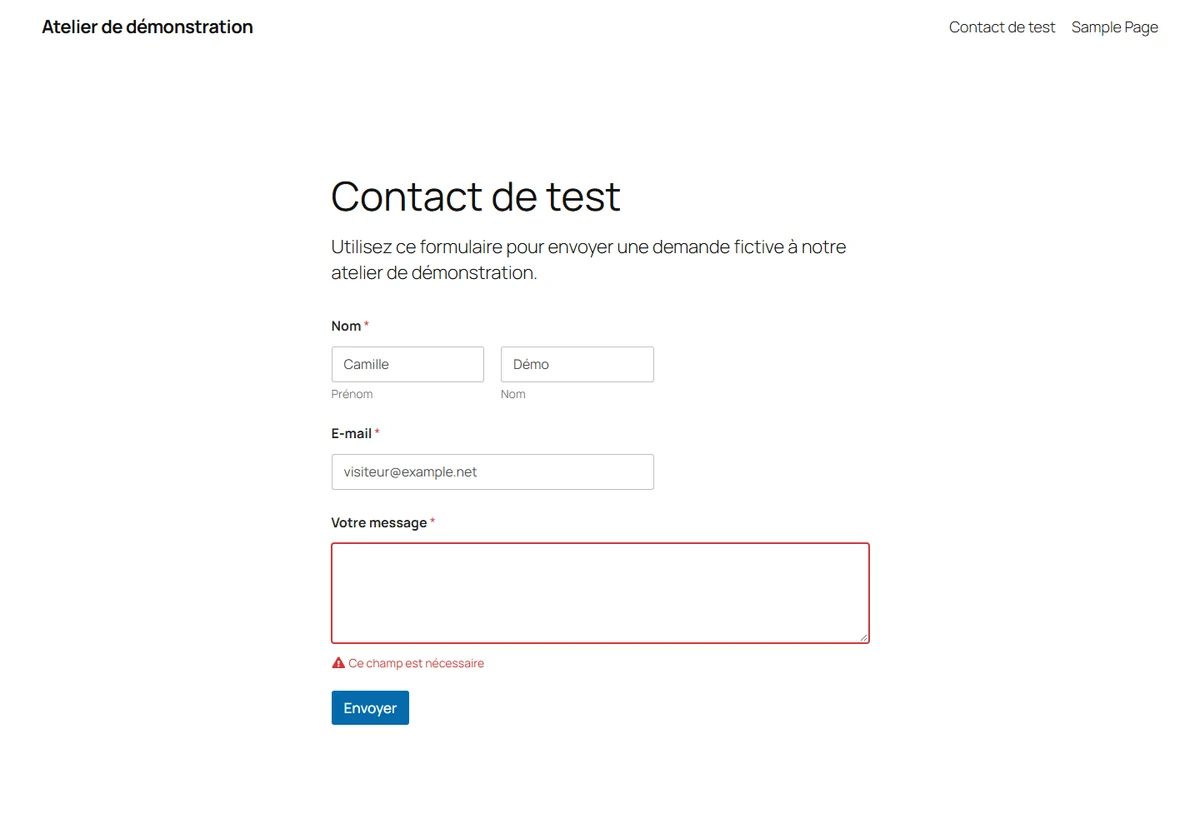
To check validation, also plan an attempt with an empty required field. The form must display guidance near the field and remain available for correction. In the screenshot, WPForms displays “This field is required.” The test inbox must remain empty after this attempt. You can then complete the field and submit the same form. This pair of tests provides a more meaningful result than a builder preview alone.
Embed the form in a page using the WPForms block
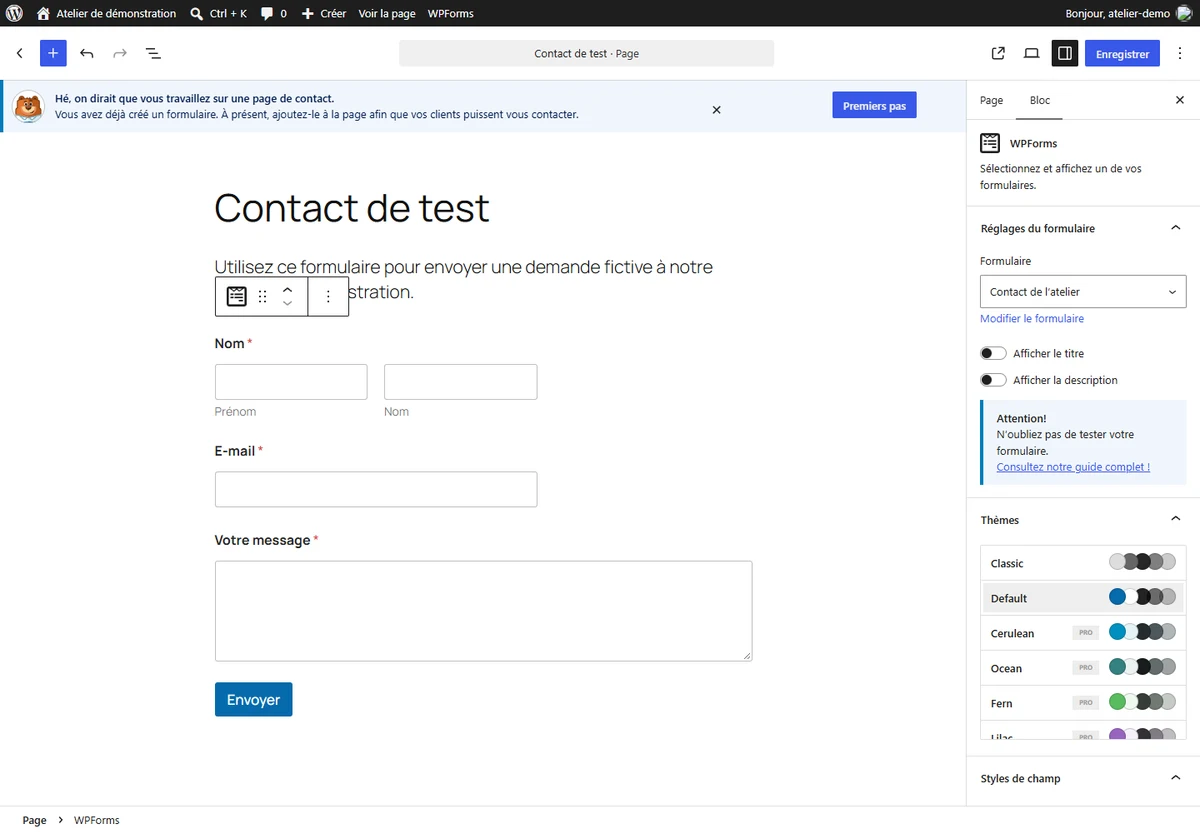
Under Pages → Add New Page, create a “Contact de test” page. Add a short paragraph explaining the types of requests the team can handle. Insert the WPForms block using the add-block button. Search for WPForms, choose the block, then select “Contact de l’atelier.” Its name must match the one you saved. On the page, place the block just after the instructions. Check that it displays the name, email address, message and submit button.
Publish the page on your test installation. In the editor, pressing Publish once may open the review panel. Confirm if WordPress asks. Then use View Page to obtain its exact address. Test that address in a private window or browser profile without a WordPress login. On staging protected by an access password, pass that protection, then ensure you are not signed in as a WordPress administrator.
If the WPForms block is absent from your editor, you can use the shortcode supplied in the form list. Copy the entire value, including the ID in quotation marks. Paste it into a Shortcode block or your page builder’s shortcode area. The number belongs to your installation. Verify that the shortcode renders the same form as the block by comparing their IDs and fields on the copy. Copying the screenshot’s shortcode may point to a different form or none at all. After publication, open the address and verify that the form appears in place of the shortcode.
Send a fictional request as a visitor
Open the page address from a logged-out session. Scroll to the form and initially leave the Message field empty. Fill the other fields, click Submit and observe the guidance. Then complete the field with “Test contact BPC-01 — Merci de vérifier ce message fictif.” For the local test, use Camille Démo and visiteur@example.test. The empty-field screenshot uses visiteur@example.net, another demonstration address. For a test on your site, use a test visitor address you control.
After a valid submission, wait for the configured confirmation to appear. Record the text obtained and the attempt time. If the page stays on the loading button or displays an error, first record what you see. Check that the Email field is entered correctly, the open page is the published one and the same form appears in a private session. Avoid repeated clicks, because closely spaced attempts may produce several notifications and complicate interpretation.
Check again on mobile or with a reduced window width. Fields must remain visible, the button accessible and confirmation readable. Also verify that you can move between fields with the Tab key. You can do this without sending a second message. If another submission is needed, change the reference, for example to “Test contact BPC-02,” to identify the new attempt in the inbox.
Check the notification in the inbox
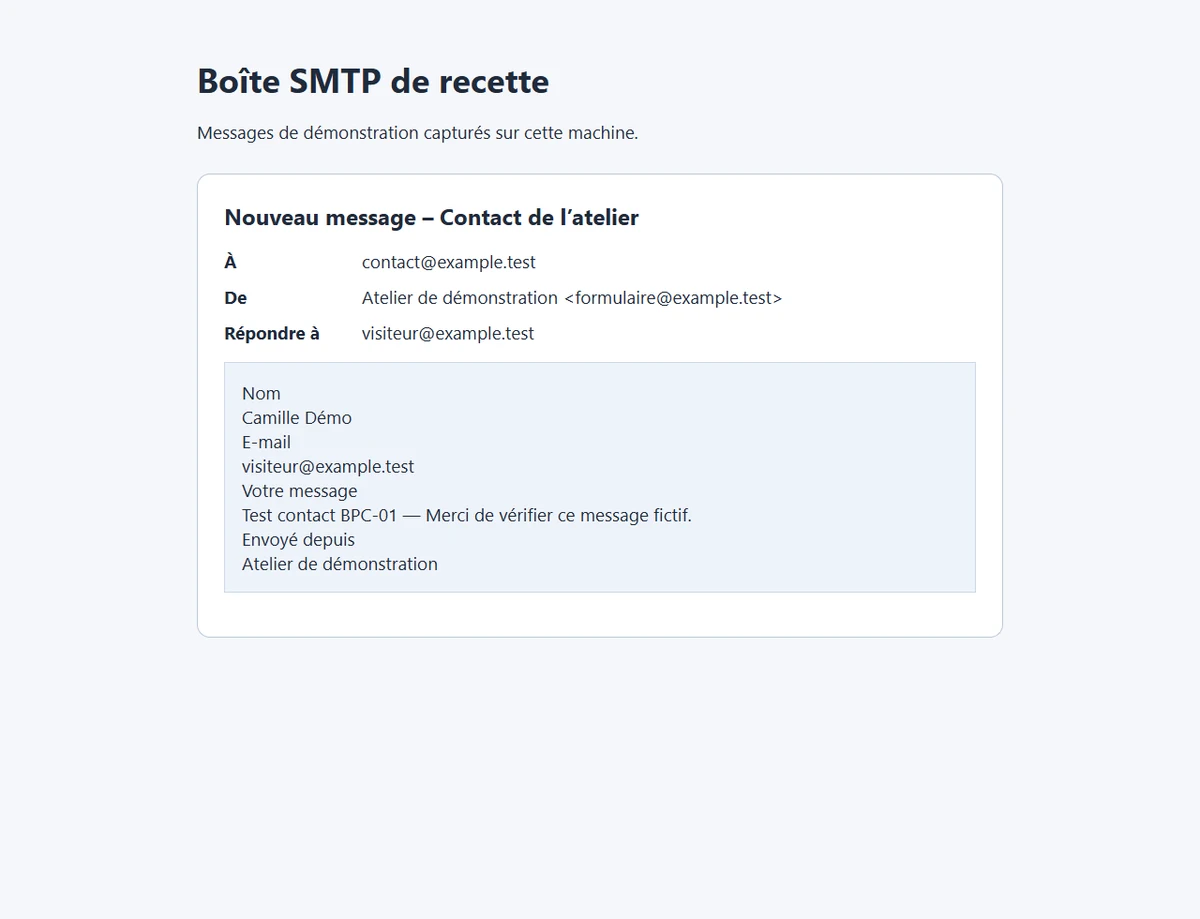
Open the inbox chosen in the notification settings. For this guide’s test, WordPress hands its email to a local SMTP server that captures the message on the machine. The inbox displays the received notification and its headers. In a real inbox, start by searching for the subject or message reference, then check spam and sorting rules if necessary. Record the recipient, sender and reply address.
The email body must include the entered name, address and text. Click Reply to see whether its destination matches the test visitor, then close the draft. In the screenshot’s local inbox, the Reply-To line lets you check this directly. To validate the production process, repeat the test with a controlled external inbox and check where the email is classified. A local test proves delivery to its capture server. Delivery at Gmail, Outlook or your provider must be checked in their inboxes.
If confirmation appears but the notification is missing, compare the settings of the form actually embedded and your transport logs, if available. Check notification status, recipient and authorized sender. A test send from your SMTP tool can isolate transport. If it works while the form produces no message, return to the form, its settings and the embedded block’s identity. If it also fails, examine transport first.
Check Lite’s limitations before receiving real requests
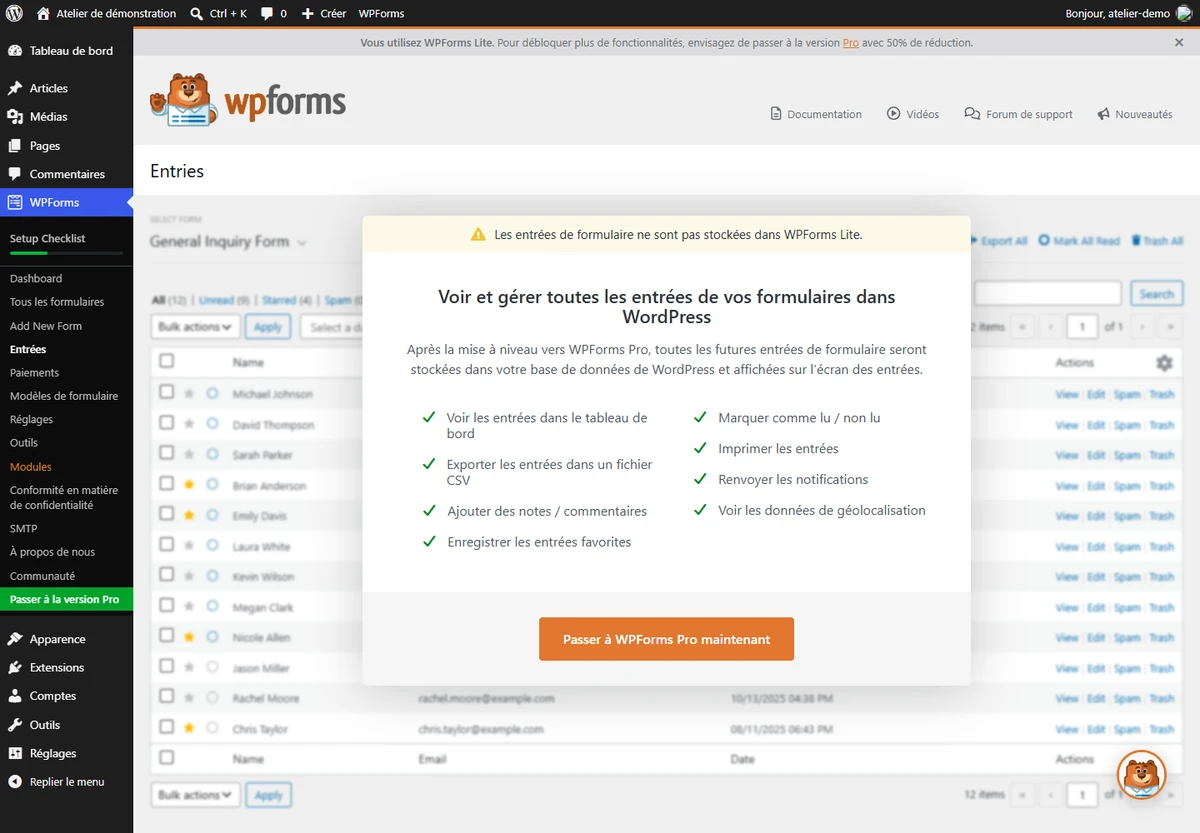
WPForms Lite supports the process shown here with a contact template, notification and confirmation. In the tested version, viewing the entry list in administration requires a paid license. A notification received in your team’s inbox therefore remains an essential part of the process. If the inbox misses an email, do not rely on a local WPForms Lite history to recover its text.
If enabled, Lite Connect backs up new entries on WPForms servers. The publisher’s documentation states that recovery in WordPress requires a paid license, entries before activation are not covered and the stated retention period is one year. Lite Connect was disabled and unavailable in the local environment used for testing. If your team requires a request register viewable without relying on notifications, or wants to limit data destinations, define that need before opening the form to the public.
Some functions are separate from the simple contact form. Conditional logic and file uploads are presented as paid features. If your use requires an attachment, multiple notification routes or display rules, check the license scope in your version before designing the process. For the form created here, three fields and one notification are enough. A support request, customer record and job application form have different retention needs.
Prepare launch and keep a test record
On the public-facing site, review the form’s IDs and values. Replace fictional addresses with the chosen recipient and sender. Add a simple explanation of data use near the form and access to your site’s privacy information. Check that the test form is not in the menu and the final public page points to the right form. If the test page is no longer useful, return it to draft in your working installation.
Keep a short test sheet with the URL, WPForms Lite version, test time, empty-field result, confirmation text and receipt result. Add who monitors the inbox. If several people access it, they must know how to reply from the shared inbox without exposing a personal account. You can use a fictional reference reusable after changes to the theme, page builder, cache or sending tool.
Testing is complete when the public page displays the three fields, an input error leaves the form accessible, a valid submission confirms processing and one identifiable email arrives at the correct recipient. Also check the reply destination. If any point fails, retain the results of previous steps. They indicate where to resume checking and avoid reconfiguring the page, form and email system at the same time.
Check spam protection before opening the form
In the WPForms builder, open Settings → Spam Protection and Security, or its translated equivalent depending on the language. Record the built-in spam protection’s state and retain it during testing. The documentation states that modern protection requires JavaScript; an optimization preventing it from loading therefore deserves diagnosis if a legitimate visitor can no longer submit.
On the test page, send another fictional message as a logged-out visitor after cache or optimization settings, then check the notification. Do not immediately stack several CAPTCHAs. WPForms Lite also supports integrations such as Turnstile, but configuring them involves the third-party service, its keys and authorized domain. Start with built-in protection, then choose an additional integration if the need is established. To undo a test, restore only its previous setting and send another identifiable submission; do not leave the public form without the selected protection.
Sources and references
Use these references to check the features, requirements and limitations described. Reading documentation is not a practical test.