

Compare a specific difference instead of rebuilding the page
The page looks correct while editing, but its text, colors or layout change on the public site. The desired result is a consistent presentation for visitors without rewriting content that already works. A screen difference does not prove saving failed: the editor and public page do not always load exactly the same context.
Start by choosing a reference element. For example, an oversized heading, a narrowing column or a button whose color changes. Record the public address, the page open in administration and the circumstances. Several differences may have several causes; it is better to resolve the first reproducibly.
The initial checks require only a browser and permission to view or edit the relevant page. Tests involving shared settings or plugins take place on a backed-up copy. On WordPress.com and multisite, also confirm the selected site: similar titles may exist in several spaces.
- Open the public page and retain its complete address.
- Open the corresponding record in administration.
- Choose a single element to compare and describe the visible difference.
- Record whether the problem affects all visitors, only your browser or one screen size.
- Keep a screenshot before any correction.
Choose between comparison, settings and style files
The first approach checks that you are comparing the same version under similar conditions: saved page, public address, session and window width. Choose it before any change. It rules out a draft preview, a role difference or a simple width change.
The second approach checks native block settings and the rule actually applied. It suits an isolated element with an incorrect color, size or width. The third concerns a missing or outdated style file. It uses browser tools, then, only on a site already equipped with Elementor, its documented regeneration tool.
A new plugin is unnecessary to observe the page or correct a native setting. Installing a builder to resolve a specific difference would add another structure to diagnose. If your page already uses a builder, open its actual editor instead of mixing settings from several tools.
- Start by comparing the version and screen.
- If the difference persists on one element, examine its settings and computed style.
- If many elements lose their styles, check loaded files.
- Change only one cause at a time.
- After each test, compare the reference element and another page that should remain identical.
Approach 1: confirm the saved version and correct address
In the editor, check that the latest changes were saved. Reopen the record if needed to confirm retention. A draft preview shows a work in progress; the public address of an already published page may still show its previous public version. These are two different results, without necessarily indicating a formatting fault.
Use the View Page link to reach its actual destination. Compare it with the menu or bookmark destination used initially. A link to another page, an old address or a staging version can explain an inconsistent comparison. The title displayed in the tab is not enough to identify the correct destination.
The expected result is a comparison between the same saved content and its intended public context. This step does not require republishing a draft merely to test. If the status must not change, keep the diagnosis within the appropriate preview.
- Open page settings and record its status and address.
- Save authorized changes, then reopen the record.
- Open View Page or the preview corresponding to its status.
- Compare addresses, including domain and path.
- Then check the public page in a logged-out session.
- If you edited the wrong record, restore its initial state before correcting the right one.
Compare equivalent widths and sessions
The editor occupies an area reduced by its panels. A public page open in a wider window may therefore arrange the same blocks differently. First compare similar widths and return browser zoom to a normal value. A responsive difference, meaning one related to screen size, is not proof of lost content.
In Chrome, developer tools allow precise comparison. Open them through the browser menu or usual shortcut, then enable the device toolbar. Choose Responsive and enter a width. This simulation approximates a mobile screen; it does not replace checking on a real phone.
The expected result is knowing whether the difference depends on a width threshold or the session. Administration may add a toolbar and load resources specific to logged-in users. Retain these conditions in your record.
- Open the public page in a logged-out session.
- Compare it with the preview at a similar width, then at a smaller width.
- In Chrome, open developer tools and enable Toggle device toolbar.
- Choose Responsive and record the width used.
- Check whether the element changes only at certain dimensions.
- Disable simulation and restore the initial zoom after checking.
Rule out an old browser copy without purging the entire site
A browser may retain files previously received. To distinguish this possibility, use a new session and then load with browser cache disabled in developer tools. In Chrome, open Network and check Disable cache before reloading. This setting applies while the tools remain open; it does not purge hosting or delivery network caches.
The expected result is a comparison between normal loading and loading with this cache disabled. If the display changes, record the relevant resource. If nothing changes, do not conclude that all caches were eliminated. The document or files may still be served by another layer.
This step changes no WordPress setting. To return to normal operation, uncheck Disable cache and close the tools. Do not ask visitors to permanently disable their cache as a final solution.
- Open the public page in Chrome and developer tools.
- In Network, check Disable cache.
- Reload the page and compare the reference element.
- Record files or responses differing from normal loading.
- Uncheck the option after testing.
- If a server purge is needed, use only the documented command of the tool actually installed, targeting the page where possible.
Approach 2: revisit a local setting in the native editor
For a native block, select the element in List View, then open its block settings. Check width, alignment, typography or colors according to the symptom. A setting inherited from the theme and a value defined on the block have different scopes. Record current values before testing.
Start with a simple check on a copy: remove an unusual local value or restore the expected setting for this block only. Opening the site Styles panel may let you change every block of a type; do not use it to fix a single button unless you have chosen that scope.
The expected result is a saved change that fixes the reference element publicly and remains acceptable in the editor. To undo, restore the recorded value or remove only the customization added. Do not reset the entire site’s styles for this test.
- On the copy, select the relevant block in List View.
- Record its local setting and any displayed inherited value.
- Change a single property related to the difference.
- Save, then reopen the page address.
- Compare the reference element at the same width.
- Restore the initial value if the test does not explain the problem.
Read the rule applied to the element on the public site
If the local setting is insufficient, inspect the public element. In Chrome, right-click the relevant heading or button, then Inspect. The Elements panel shows its structure; Styles displays candidate rules and Computed the values actually calculated. A crossed-out rule may be overridden by another higher-priority rule.
Choose a property related to the symptom, such as text color or size. Record its value and the file indicated next to the rule. This gives you a more precise lead than “the theme does not work.” The file may belong to the theme, a plugin or a saved customization.
The expected result is identification of the rule explaining the difference. A change made in these tools is generally temporary and is not a saved WordPress correction. After testing, reload the page to return to its actual state.
- Inspect the reference element at the public address.
- In Computed, search for the relevant property.
- Expand its source or find the rule in Styles.
- Record the applied value, selector and file.
- Temporarily disable a suspected declaration with its checkbox to observe the effect.
- Then reload the page; do not copy a general rule into the site without identifying its scope.
Approach 3: check the stylesheets actually received
A large part of the page may lose its presentation when a stylesheet is missing, receives an incorrect response or corresponds to an old generation. In Chrome, open Network before reloading the page and filter CSS requests. Select the file related to the relevant element or builder, then inspect its address, status and response.
A success status is insufficient if the server returns an HTML page instead of the expected CSS file. A 404 error indicates a missing resource; denied access or blocking requires another diagnosis. Do not disable an entire protection to make every file accessible.
The expected result is an actionable record of the file actually received. It requires no terminal command. Keep only useful data: resource address, status and time. Avoid sharing a complete network export that may contain session information.
- Open Network, then reload the public page.
- Filter by CSS and select the relevant resource.
- Examine Headers and Response to confirm that it really contains styles.
- Record an error or unexpected destination.
- If only the font differs, also examine Font requests.
- Then fix the resource or its generation in the identified tool instead of changing every block.
Elementor already installed: regenerate files and data
This approach applies only to a page already built with Elementor and missing or outdated generated files. The plugin is published by Elementor. Compare its current listing with the site’s WordPress and PHP versions; do not install it to fix a native page that does not use it.
Prepare a verified backup and start on a copy. Current documentation gives the path Elementor → Editor → Home, then Tools in the left panel. Use Clear Files & Data before checking public resources again. Translations may vary.
The expected result is reloading the necessary files and a correct display. This operation does not fix a competing CSS rule or the wrong page being open. There is no universal Undo button for a purge; if regeneration fails on the copy, retain the error and use its backup to return to the previous state.
- Open Elementor → Editor → Home in the copy’s administration.
- Click Tools in the left panel.
- Click Clear Files & Data, then Save Changes.
- Reload the public page and check CSS requests.
- Purge the identified cache layer if it still retains the old version.
- Compare the reference page and stop repeated regeneration if the result does not change.
Isolate an optimization only when the file points to it
A generated or combined stylesheet may belong to an optimization tool rather than the theme. If requests show that this resource is problematic after a recent change, start by identifying that tool and its documented setting. Menu names differ; do not look for a universal “CSS repair” switch in WordPress.
On a backed-up copy, an administrator can compare the display with the suspected component temporarily deactivated in Plugins → Installed Plugins, when that action is available and appropriate. Do not deactivate several components together: an improvement would become difficult to attribute. Do not perform this test on a public store for a simple diagnosis.
The expected result is a reproducible difference between two precise states. If the tool is responsible, then correct its targeted option or documented exclusion and regenerate its own files. Permanently deactivating it without understanding the result is not the final correction.
- Record the faulty file and the component it belongs to.
- On the copy, record that component’s initial state.
- Deactivate only the identified suspect if this permits a meaningful test.
- Reload the same page at the same dimensions.
- Reactivate it and check whether the difference returns.
- Restore the initial state if the result does not confirm this lead.
Fix the style source instead of multiplying overrides
Editor styles may be supplied separately from public site styles. A customization loaded only for editing can therefore produce an attractive preview that does not match the visitor’s display. Conversely, a public theme rule may override the block setting. Comparing files and computed values distinguishes these two situations.
If the rule comes from a native setting, return to that precise setting. If it comes from a custom file, its maintainer must fix loading or the rule in the identified source on a copy. WordPress provides, among other things, a per-block style loading mechanism; using it requires the real block name, existing file and intended scope, not a rule blindly copied into every context.
The expected result is a maintainable fix connected to the identified cause. Retain the original file or value before intervention. Avoid accumulating priority declarations that hide the cause and may break another page.
- Connect the observed rule to its setting or file.
- On the copy, correct one confirmed value or loading operation.
- Reload the editor and public page.
- Check a second page using the same component.
- Restore the initial source if the fix causes another difference.
- Record the cause and chosen location before removing temporary experiments.
Validate public rendering and finish diagnosis
A useful resolution preserves content and produces the expected presentation in contexts actually used. The editor does not necessarily have to reproduce every header detail or visitor-specific element; it must let you prepare the page without hiding an important public defect. Therefore check the result at the real address, not only in an editor screenshot.
Use the same widths and session as in the initial observation. Check links and interactive elements if regeneration or optimization affected them. For a mobile problem, supplement simulation with a real phone. Keep the distinction between a documentation check, a preview and a test actually performed.
Keep a short note: reference element, cause found, corrected setting or file, before/after comparison and rollback. It helps explain a recurrence without repeating every operation. No additional change is necessary once the expected check succeeds.
- Open the public address in a logged-out session.
- Check the reference element at the recorded widths.
- Check a second page and main functions.
- Reopen the editor to confirm saved content.
- Remove temporary experiments and restore browser tools to normal.
- Keep the backup or initial value until the correction is validated.
Compare the winning rule in the editor and public page
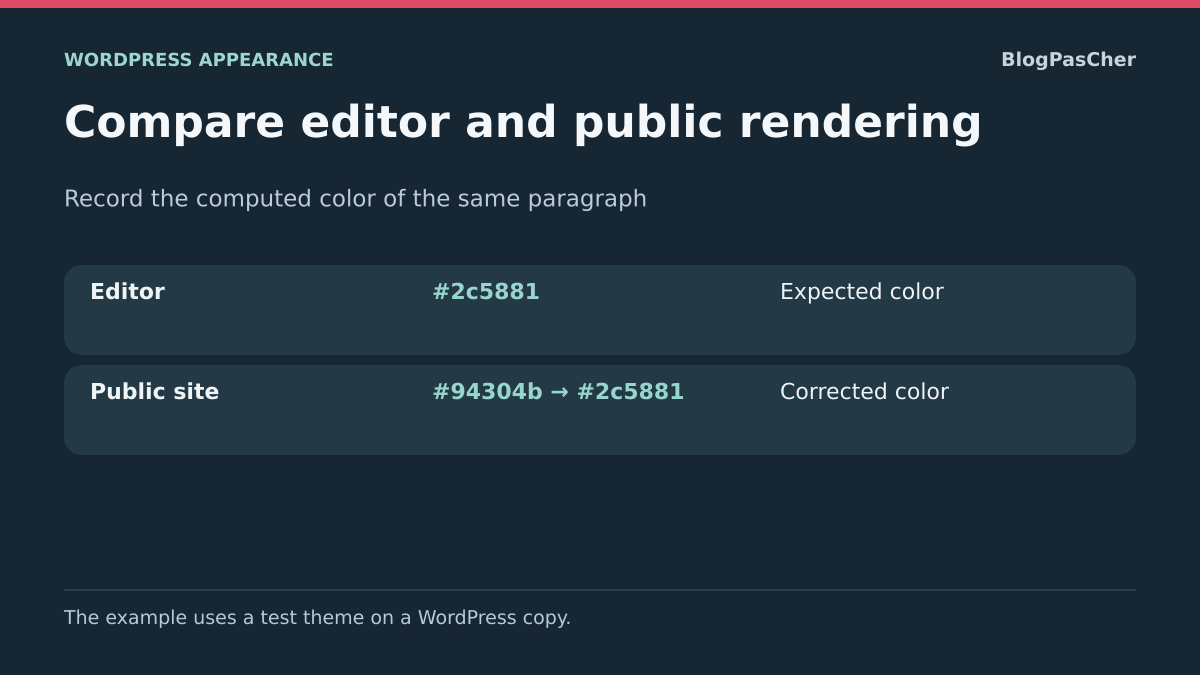
To compare contexts, choose the same paragraph, its class and its text in the editor and public site. Inspect the color property in Computed and record the winning rule in each context. Different stylesheets may explain different values.
The following synthetic example illustrates two divergent rules. Class names and colors are fictional markers; identify the real stylesheets before correcting your site.
/* Feuille de l’éditeur */
.probe-render { color: #2c5881; }

/* Feuille publique avant correction */
.probe-render { color: #94304b; }
Confirm the correction with a new public session
On the copy, change only the rule whose origin explains the difference. Keep its previous value, then check the computed color in both contexts and a reference page before retaining the correction.
If the inspector indicates the same file and rule but a different display, compare width, parent and inherited rule before adding an override. If the two stylesheets consistently diverge in a theme you maintain, align content styles at the appropriate level, then check the editor and public page after each change.
Compare styles within the editor’s own document
The block editor may display its content in a separate embedded document. A stylesheet loaded for the administration interface is therefore not necessarily available in the area where blocks are rendered. Inspect the reference paragraph itself, then trace the computed rule; do not conclude solely from a file’s presence in the administration page.
For a developer-maintained theme, check the mechanism loading block styles in the required contexts. WordPress provides wp_enqueue_block_style, among other tools, with the full block name and stylesheet parameters. The file path, public URL and dependencies must match the actual theme. Copying every public site stylesheet into administration may introduce rules affecting editor controls.
The no-code approach remains correcting the identified local or global setting in the interface. For a loading correction, test the computed rule in the editor, preview and public page at comparable widths. Then check another block of the same type. If the interface or another page worsens, restore only the added loading operation or rule, then resume comparing contexts.
Sources and references
Use these references to check the features, requirements and limitations described. Reading documentation is not a practical test.
View 11 references
- WordPress: editor and content preview ↗
- WordPress: publishing and template settings ↗
- WordPress: global and individual styles ↗
- WordPress: styles and theme support ↗
- Chrome: screen size simulation ↗
- Chrome: browser cache and network requests ↗
- Chrome: diagnosing applied styles ↗
- Chrome: inspecting network responses ↗
- Elementor: Clear Files & Data ↗
- Elementor: current listing and requirements ↗
- WordPress: block styles and targeted loading ↗