

Prepare a reference page before configuring settings
You have installed WordPress and want to choose the title and summary proposed to search engines for a page. Free AIOSEO lets you enter this information for a page, define a shared format and produce an XML sitemap. This tutorial checks the result on a French-language demonstration installation. You can follow the same screens on a WordPress installation where you have the necessary administration permissions.
Choose just one page to start. In our example, the page published on the copy is called “L’atelier de reliure.” It explains what a beginner learns during a session and where to find practical information. A real site could choose a service page addressing a specific need. Record the page address, current title and, if present, meta description. These three reference points will help you identify which setting changed.
The page title remains what the reader sees at the top of the content. The title tag appears in the page’s code and browser tab. The meta description is a summary supplied in that same code. The search engine may choose a different title or snippet depending on the query. This exercise aims to check what WordPress sends for the chosen address. Keep WordPress verification separate from results that may appear only after the site is crawled.
Install the free version from WordPress
In the dashboard, open Plugins, then Add New Plugin. Search for “All in One SEO.” Select the official listing whose directory name is all-in-one-seo-pack. Click Install Now, then Activate. Return to Installed Plugins to see the active plugin and its version number. This guide’s demonstration screens show the free edition; record the versions actually installed and language before comparing labels.
If another SEO plugin already manages the site, record the settings you rely on, particularly titles, descriptions, indexing rules and sitemap address. Prepare the transition on a copy and choose which tool will produce the tags. Two active plugins writing into the same page’s code complicate diagnosis. If the wizard offers to import existing settings, first check a few reference pages and items not included in the import.
The wizard may offer an account, modules or additional services. To enter a title, write a meta description and check the general XML sitemap, start with the free edition alone. In our exercise, no AIOSEO account was connected and no Pro license activated. If you only have editorial access, ask the administrator to install and validate the plugin. Then resume the exercise with the account the team has authorized to edit the page.

Approach 1 — Enter an SEO title for a single page
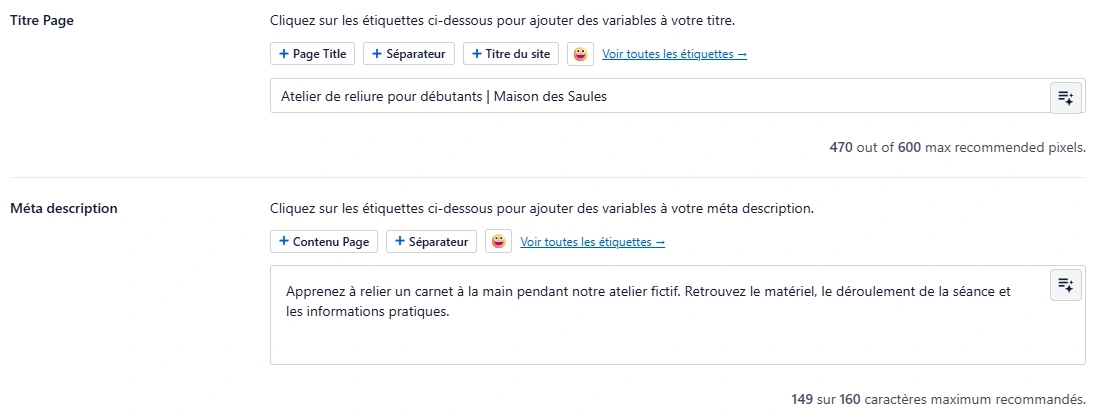
Open Pages, then the reference page. In the block editor, close the welcome tour if open. At the bottom of the screen, open Meta Boxes if the panel is collapsed. If the divider interferes with clicking, select the button with the keyboard and press Enter. Open AIOSEO Settings and keep the General tab selected. Find the “Page Title” field, which may contain tags representing the page title, separator and site name. Depending on your version and installed translation, the field name may vary slightly. The preview above the fields helps you identify the calculated title.
Start with the question this page answers. In the example, the title “Atelier de reliure pour débutants | Maison des Saules” identifies the subject, intended audience and organization. It corresponds to a page that actually explains how this activity works. Keep the displayed page title “L’atelier de reliure” if it feels more natural for navigation. The /atelier-reliure/ address can also remain unchanged. You do not need to change the page name or ID to enter the SEO title.
If existing tags are present, first click inside the title field. Select its contents and enter your new text. Make sure no leftover tag adds the site name a second time. Review the preview for repetition or a missing word. To return to the shared format later, record the original tags or check the default setting before modifying the page.
Write the meta description and save
In the same settings, find “Meta Description.” It may start from the page content. Select the proposed value in the field and write a distinct summary. Describe the benefit and one or two specific things the reader will find. Our example uses “Apprenez à relier un carnet à la main pendant notre atelier fictif. Retrouvez le matériel, le déroulement de la séance et les informations pratiques.” This sentence matches the demonstration content. On your site, replace it with information specific to the page.
Avoid repeating the title word for word, adding a keyword list or promising information that is absent. Read the summary on a narrow screen and put important information first. The preview can help assess wording, but remains indicative. On a service page, check that the summary differentiates it from other services. A generic sentence repeated everywhere gives the reader little information.
Click Save in the editor for an already published page. If working on a real draft, keep its status until the owner approves it. Our page is published only on the test site. Reload the editor after saving and reopen AIOSEO Settings. Check that both values are still present. This reread distinguishes a saved change from a preview that merely refreshed while typing.
Approach 2 — Define the shared page format
If you have several pages, a default value avoids starting with an empty field every time. In the All in One SEO menu, open Search Appearance, then the Content Types tab. Find the Pages section. The global setting defines the format used for pages without individual customization. It may combine tags such as the page title and site name. Check that you are in Pages, not Posts, whose audience and editorial format may differ.
Start with a simple title rule. Keeping the page title and adding the site name once is often enough. For the description, avoid writing a generic sentence to repeat across dozens of pages. When default content or excerpts produce inconsistent results, reserve manually written descriptions for important pages. Before changing an existing format, record its tags and their order so you can restore it.
Validate two reference pages before extending the change. The main page must retain its custom title and description. A second page with no individual value must follow the chosen shared format. Check both addresses after saving. If both display the same description, check that the main page retained its individual value and review the global format. This test avoids confusing a site setting with a one-page correction.
Check the title and description in the served page
Open the page’s exact public address in a new private window. On a copy reserved for your team, use the browser and access authorized for that copy. First check that the title visible in the content remains as expected. Then look at the tab label. It should show the saved SEO title if you are viewing the correct page and the theme lets WordPress manage the title.
To confirm the values, use View Page Source in the browser. Search for <title>, then name="description". The description tag is in the document’s head section. Its value is in the content attribute. Look for the standard meta description. The og:description or twitter:description tags serve other previews and may have different values. The lines below show the two elements read on our demonstration page.
If you find two title tags or two meta descriptions with the same name, identify the component adding each before changing your text. A theme or another SEO plugin may still write into the page. If you simply see the old value, check the address, saved status and versions retained in that page’s cache. Compare the code before and after a targeted refresh. A global cache change would make diagnosis harder.
<title>Atelier de reliure pour débutants | Maison des Saules</title>
<meta name="description" content="Apprenez à relier un carnet à la main pendant notre atelier fictif. Retrouvez le matériel, le déroulement de la séance et les informations pratiques.">
Open the general XML sitemap
In the dashboard, open All in One SEO, then Sitemaps. Check the “Enable Sitemap” state in the general sitemap. If the site already has another sitemap, record its address before changing the supplying tool. On this exercise’s copy, AIOSEO was the only active SEO plugin. The sitemap responded at /sitemap.xml on that same installation.
The first file may be an index. It indicates where to find sitemaps for each content type. In our example, the index contained /page-sitemap.xml. Open the one corresponding to pages and find your reference page’s exact address. Check the domain name, protocol and end of the path. If you disabled the index on your site, the general file may display addresses directly. Review the option actually enabled before looking for a child file.
Check that the sitemap returns XML and that the page list contains the expected reference address. These two observations validate production of the list without proving crawling or indexing by a search engine. Keep demonstration sitemaps out of public submissions and reserve Search Console checks for the authorized site.

If a page is missing from the sitemap
Start by opening the page with a reader’s access. If it is still a draft, private or inaccessible, retain that state until publication has been decided. Then check whether the Pages type is included in the general sitemap. A page of another type may be in a different file. Examine existing exclusions and the editorial decisions behind them before changing the setting.
For a public page intended for indexing, also examine overall site visibility and the page’s indexing setting. A staging copy is often intentionally excluded. Keep this protection on private environments. For real publication, check the rule applying to the page with the site owner. A general rule and an individual exclusion may have different effects.
If the sitemap button opens an HTML error page or returns 404, check the proposed address and first open an ordinary page permalink. If both fail, the problem may involve site routing. If only the sitemap address fails, confirm the sitemap provider and cache applied to that file. Make one change at a time, then compare the response. The related sitemap guide details diagnosis when the document is missing or contains failing addresses.
Know when the free edition is enough
For the task covered here, you need the page’s SEO fields, default format and general XML sitemap. These functions belong to the free edition. Some interface sections present additional options. Redirect management, the local SEO module and advanced WooCommerce SEO functions belong to paid plans depending on the module. If your immediate goal is simply to check tags and the general sitemap, you can finish without activating these modules.
The plugin also displays content suggestions. Read them as guidance. A favorable indicator does not guarantee that a search engine will display your text. It also does not establish whether the page clearly answers the visitor’s question. After checking the code, reread the content itself and consider whether the title accurately describes what the page offers.
If comparing other plugins, first check whether the desired function is actually missing. For example, adding a redirect after an address change is a different task from writing a meta description. Gather your site’s requirements before switching plugins. Keep existing settings to test differences on a copy.
Keep a simple check for future pages
Before ending your session, retain useful evidence in a short record. Note the address, SEO title, description, source-code result and sitemap presence. Add the check date if several people work on the same site. When updating another page, repeat these checks on its address. The shared format remains useful, but text written for a specific page must remain specific to that page.
If you need to roll back, restore the saved individual values and save the page. If the change concerned the global format, restore the previous tags and values in the Pages tab and also check another page depending on that format. If you changed the sitemap, restore only its previous state or the provider chosen at the start. Keep the address to give the person responsible for search engines.
Consider the exercise complete when the correct page serves a single title and description and its address appears in the intended place in the installation’s sitemap. For a public site, proceed to a separate indexing check. This final step helps you ask a precise question if the search engine does not show the page or prefers another snippet.
Back up settings separately from content metadata
Before a global change, open All in One SEO → Tools → Import/Export. The documentation distinguishes exporting settings from exporting content SEO metadata. Keeping a settings file must therefore not lead you to assume all individual titles and descriptions are backed up. Check the sections and boxes actually available in your edition.
Date the export and state its scope: shared formats, sitemaps or selected content types. Also keep your reference page’s two values for a targeted undo. A bulk restoration may overwrite legitimate changes made since export; test it on a copy first and compare the customized page with the one depending on the global format. To correct a single page, restoring its recorded values is more precise than importing all site settings.
Sources and references
Use these references to check the features, requirements and limitations described. Reading documentation is not a practical test.