

What the confirmation actually tells you
A visitor fills in the form, sees a success message, and then nobody receives the request. This symptom can result from an incorrect recipient, deliberately disabled sending, a rejected sender or delivery blocked after handoff to the transport. The displayed confirmation does not demonstrate arrival in the inbox. With some configurations, it can even appear when no email was requested.
The desired outcome is specific: a submission through the form actually in use must produce the expected notification in the correct mailbox, with usable content and replies addressed to the right person. The acknowledgment sent to the visitor is a separate message. Check them separately, especially if the team receives one but not the other.
Start with the existing form settings, without installing a second form solution. The detailed example uses Contact Form 7 already installed. For another plugin, look for equivalent settings in its notifications; the menu names below do not automatically apply. WordPress itself has no universal setting for all forms.
Prepare a reference submission without customer data: a recognizable subject, your own address and a short text explaining that this is a test. Record the time and time zone. If an integration also creates a contact or sales task, have that scope confirmed before testing. A test copy must have isolated recipients and integrations; its name alone does not guarantee this separation.
Find the embedded form and record its configuration
This first check requires permission to edit the page and the relevant form. Open the page for editing and select its form block. With Contact Form 7, record the form selected in the block; with an older Shortcode block, record the shortcode identifier. Two forms can have almost identical titles while sending to different addresses. Their visible administration titles are therefore not enough to match them.
In Contact → Contact Forms, open the item matching the page identifier. In the current version, the Contact menu may also open a dashboard: make sure you go to the form list. Copy the settings from the Form, Mail, Messages and Additional Settings tabs into a private file. This copy lets you restore the exact values you change.
Check the official Contact Form 7 listing and the requirements of the offered version before updating. Compare them with your current environment. Diagnosing a notification does not by itself justify a technical migration.
On a multisite network, work in the dashboard of the site containing the page, even if the plugin is network activated. On WordPress.com, follow this approach only if your installation actually allows you to use and configure this plugin. Find the correct form before changing a single recipient.
Approach 1: restore a notification that is deliberately skipped
This approach is suitable when a form appears to work but was prepared in demo mode or integrated with a system that replaces its email. In Contact → Contact Forms → your form, open Additional Settings. Look for the lines demo_mode: on and skip_mail: on. Do not replace everything in this tab: other settings may serve a useful purpose.
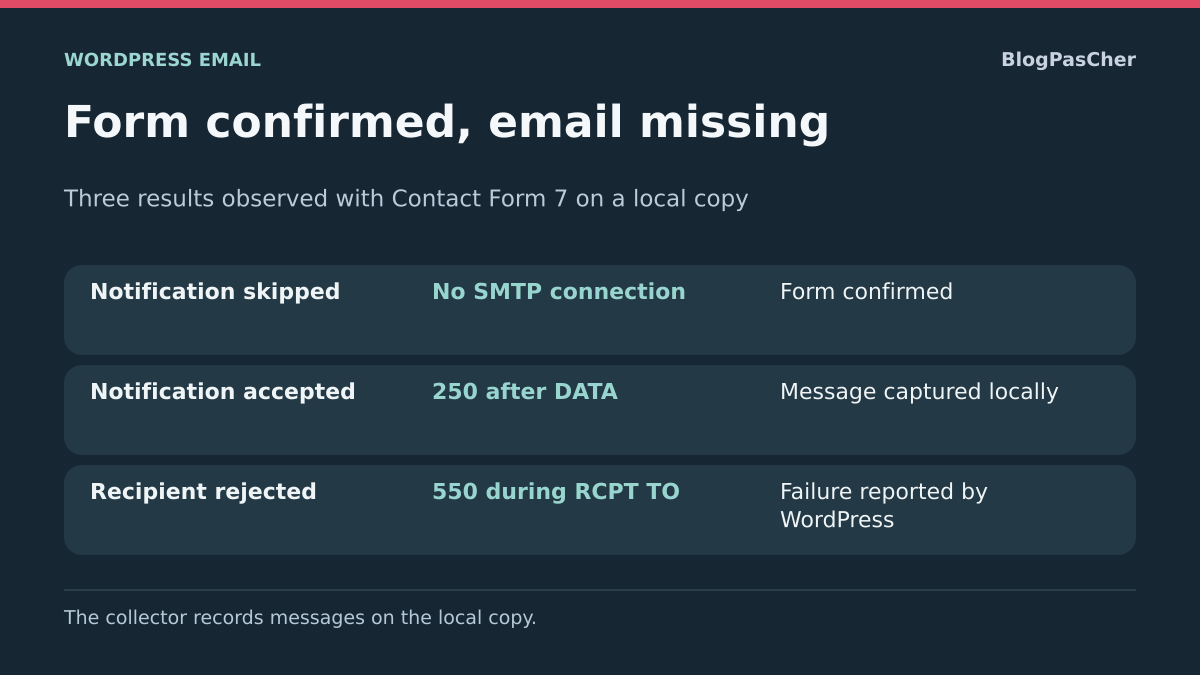
In the version examined, demo_mode displays success without sending email and also affects saving through the Flamingo integration. skip_mail skips sending while allowing other processing. Thus, a locally saved message and a displayed confirmation do not prove that an email was supposed to be sent. These settings may be entirely intentional on a demonstration or a form connected to another tool.
If the identified line was mistakenly left on the public form, keep a copy, remove only that line and click Save. Then make a single reference submission from the relevant page. The expected result is an actually received notification, without changing the other form functions. To restore the initial state, put the exact line back in the same tab and save.
If neither line is present, do not add them with an improvised value. A custom snippet may also skip sending through the wpcf7_skip_mail filter. This possibility requires the person maintaining the relevant code to read it; it does not justify deactivating every plugin on the site. First move on to the notification and its recipient.
Check To and choose the correct notification recipient
Open the form’s Mail tab. In To, find the address of the team that should receive the request. An old sales address, a typo in the domain or a deleted alias is enough to explain a missing notification. Check the exact mailbox, including its webmail, spam, rules and forwarding. The visitor’s mailbox is not the team’s mailbox.
For the main team notification, a fixed authorized address makes checking straightforward. If To contains a dynamic tag, check what it actually produces. The special site administration email tag refers to the corresponding WordPress setting; a field tag depends on the form. Do not replace every address on the site to fix this one recipient.
If the form routes messages by department, start with the failing branch and record the intended mappings. A successful test with one department does not validate the other choices. A recipient mailbox freely supplied by the visitor is not an internal routing solution: it can allow messages to be sent to third parties. Keep the list of team recipients under administration control.
Save a targeted correction and submit the form from its page, selecting the relevant department. The expected result is receipt in that specific mailbox. To undo it, restore the original To value and only the mappings you changed. If changing the recipient produces no message, keep that finding and now check the sender instead of adding more Cc and Bcc copies.
Separate the site sender from the visitor’s reply address
In the notification’s From field, use an address on the site’s domain accepted by the sending service. The address entered by the visitor must not be used to make your server impersonate their email provider. An address belonging to the domain is necessary for a consistent configuration, but it is not enough to prove authentication: the transport must be authorized to use it.
If the team needs to reply to the visitor, use Reply-To in Additional headers. Before adding the line below, check in the Form tab that the email field is indeed named your-email and is a required email field. Its name is the one in the form tag, not its visible label. If you use another name, adapt the reply tag to that exact name.
The example does not replace the entire Mail template. It concerns only one line in the Additional headers field. Keep other useful headers and replace an old conflicting Reply-To line instead of adding several. Do not insert this line in the message body or the From field.
Save, then send a reference submission using your address. On receipt, open a reply without sending it and check that its recipient is your reference address. The expected result combines an authorized sender with replies addressed to the visitor. To undo, restore the From and Additional headers values recorded before the change. If a transport plugin forces the sender, also check that effective value instead of assuming From still takes precedence.
Reply-To: [your-email]Check the content and distinguish Mail from Mail (2)
In Message body, every expected piece of data must have the tag corresponding to its form field. A field displayed on screen is not automatically added to the email. In particular, compare the message field name with its tag in the template. The desired result is an email containing the intended information; an unknown tag or an empty value cannot be fixed in the SMTP server.
Choose an identifiable subject for the test, then check configuration warnings after clicking Save. The validator checks syntactic consistency; it does not send email or contact the recipient mailbox. A form saved without warnings therefore still requires a receipt test. Conversely, disabling the validator does not fix a malformed header.
Examine Use Mail (2) separately. This second template can provide an acknowledgment, but its existence does not replace the main notification. It is sent after the main sending operation succeeds according to the sending mechanism, without guaranteeing that the team has already received its message. Check its recipient and content only if this acknowledgment is actually intended. Enabling it to fix a missing notification would add another message to diagnose.
If failure occurs only with an attachment, compare a reference submission without a file and then a submission with a small, harmless permitted file. Its tag name must appear in File attachments, and the sending service’s limits still apply. This check does not justify allowing all formats. Restore the copied templates if your correction does not produce the expected result.
Approach 2: compare the submission with the existing transport
This approach is suitable when the form targets the correct mailbox but the notification is still missing. Use the transport already configured on the site. With WP Mail SMTP installed, WP Mail SMTP → Tools → Email Test lets you send a test to the same team mailbox. Record the time and confirm receipt in webmail rather than stopping at the result displayed by the plugin.
WP Mail SMTP is discussed here for an existing installation. Check its version requirements before updating. Do not add it on top of another transport already managing sending. A new SMTP configuration belongs in the dedicated transport procedure, using the actual provider’s settings.
If the test also fails, the error suggests a shared cause: connection, authentication or a rejected sender. Correct the specific value involved in the existing transport, then repeat the test first and the form afterward. If the test arrives but the notification does not, return to the form’s specific features: recipient, headers, attachments, skipped sending or a custom rule.
With WP Mail SMTP, also check Settings → Misc → Do Not Send if a sending suspension may have been forgotten. In the version examined, the test can be sent despite this option while ordinary messages remain blocked. Lift a block only after confirming that it is accidental in this environment. Rollback means restoring the recorded settings; do not deactivate a working transport to try another plugin at random.
Read the logs without treating a submission as proof of delivery
Use the logs already available from the sending provider or hosting service. Find the attempt by its time, recipient and reference subject. A notification handed to the transport may subsequently be rejected, deferred or placed in spam. wp_mail success means the sending method processed the request without error; it is not an acknowledgment of receipt from the person.
Check what the log actually observes. A form entry demonstrates a saved submission. An entry created before sending does not prove handoff to the remote server. A rejection status with a reason, however, allows a targeted correction. If no trace appears, confirm that you are examining the correct transport and time period before claiming the form produced nothing.
Avoid enabling full archiving of customer content for a simple diagnosis. The reference subject, time, status and a technical identifier are usually enough to correlate the stages. Logging features vary by edition and service; the presence of a menu does not mean all histories are available free of charge. Remove secrets and personal information before sharing an error.
An absence confined to one mailbox also requires checking that mailbox’s rules and filters. A message found in spam changes the diagnosis: the notification did reach the recipient system. Its reputation or authentication still needs addressing, rather than rewriting the form that produced it.
Useful option: save future requests with Flamingo
Contact Form 7 does not save submitted messages on its own. If your team needs to retrieve future requests independently of their notifications, Flamingo can add this storage to the WordPress database. This option fixes neither SMTP nor message classification. Nor can it recover old submissions that were never saved.
Flamingo, provided by the Contact Form 7 team, is free. Check the offered version’s requirements before installation. Confirm that the team intends to store this data in WordPress, with restricted access and an appropriate retention period. An additional archive requires particular care for a form containing sensitive data.
If you have the required permissions and this storage is wanted, open Plugins → Add New Plugin, search for Flamingo, check its listing, then install and activate the plugin. Next submit only the reference message and open Flamingo → Inbound Messages. Check that it is present and inspect its fields. An entry proves storage, not email receipt.
Demo mode and certain settings prevent this storage. In particular, check do_not_store in Additional Settings, without deleting it if non-retention is deliberate. Storage consent choices may also matter depending on the form. If you abandon this option, deactivate the plugin after handling only the test data according to your procedure; do not bulk-delete real requests to roll back.
Validate the complete workflow and keep the configuration understandable
After the correction, use the public page actually intended for visitors. Make a single submission with the department choice, fields and any attachment that were causing the problem. Check the notification in the correct mailbox, its subject and content, then open a reply to confirm the recipient without sending it. If an acknowledgment is intended, check it separately in your reference mailbox.
When the problem affects only logged-out visitors, keep the mail settings you have just verified and then examine the anonymous workflow: form validation, antispam protection, cache or request authorization. A failure before sending cannot be fixed by changing the SMTP password. However, avoid removing protections from the public form to achieve artificial success.
Keep a record of the cause found, the form and the fields changed. The team recipient, authorized sender and reply field name must remain understandable to the next person maintaining the site. If a test copy used a test address, do not accidentally transfer that address to the public form.
- Notification received with replies addressed correctly: the correction works for the verified scenario.
- Transport test received but form notification missing: examine the notification and its own rules.
- Request saved without email: sending still needs attention; the archive does not close the incident.
- Message received in spam: continue diagnosing classification and authentication.
- Handoff required: provide the form identifier, time, masked recipient, observed statuses and changes already reverted or retained.
Reproduce confirmation without sending on a copy
On a local copy, create a Contact Form 7 form reserved for testing. Point the copy’s transport to an SMTP collector bound to 127.0.0.1, using the port specified by the collector. Use equipe@atelier.test in To, Atelier <site@atelier.test> in From and Reply-To: [your-email] in additional headers, if the email field is named your-email. Keep Mail (2) disabled to count only one notification per submission.
In Additional Settings, add this line only on the copy’s form. Record the reference subject before submitting.
- Submit the test form once. With this setting, success may be announced without an email request; check the response and the absence of a message in your collector.
- Remove this line, save the same form, then send a second reference submission. With the collector in acceptance mode, check that the subject, To, From and Reply-To match the expected fields.
- If both submissions show the same confirmation, compare the collector logs. The presence of the second message distinguishes skipped sending from a notification handed to the transport.
skip_mail: onRead an SMTP acceptance and a recipient rejection
The synthetic excerpts below illustrate acceptance and recipient rejection. They help explain SMTP stages and are not the result of an executed test.
The 250 code after DATA means the collector accepted the message. In a production log, record which server returned this code and look for evidence of the next relay before drawing a conclusion about the destination folder. The test’s 550 rejection occurs at the recipient stage. Check the full response in your log, then the address and transport rules if the response indicates a rejected recipient.
This protocol is intended for a local copy equipped with a collector and does not attest to execution or external delivery. If your copy has no collector, use the already configured transport’s test with a reference address whose mailbox you manage, then compare its result with a single form submission.
Acceptation locale
  RCPT TO:<equipe@atelier.test>   250
  fin de DATA                     250
  Contact Form 7                  mail_sent

Refus local
  RCPT TO:<equipe@atelier.test>   550 5.1.1
  Contact Form 7                  mail_failed
  Crochet WordPress               wp_mail_failed
Find a reference submission in Flamingo with renamed fields
After activating Flamingo, an entry may be saved with an unclear subject or sender if your form no longer uses the default field names. Open the entry and compare its data with the Form tab before concluding that a submission was lost. The list columns are not the complete message content.
In the form’s Additional Settings, Flamingo lets you specify the flamingo_email, flamingo_name and flamingo_subject mappings using the tags actually present. For example, if the email field is named contact-email, the mapping value to use is its [contact-email] tag. Keep the old lines and do not change deliberate non-retention settings merely to make this list clearer.
Then make a new reference submission: the new columns should clearly identify its date, subject and contact. Check the received email separately, because this archive display correction does not change delivery. To undo it, restore only the original mappings. Flamingo remains a free solution for saving compatible requests; it does not recover submissions made before installation and does not replace transport diagnosis.
Sources and references
Use these references to check the features, requirements and limitations described. Reading documentation is not a practical test.
View 13 references
- Contact Form 7: mail settings ↗
- Contact Form 7: additional settings and demo mode ↗
- Contact Form 7: configuring the sender ↗
- Contact Form 7: recipient syntax ↗
- Contact Form 7: configuration validation ↗
- Contact Form 7: administration interface ↗
- Contact Form 7: official 6.2.4.1 archive ↗
- Contact Form 7: official directory ↗
- Flamingo: saving messages ↗
- Flamingo: official directory ↗
- Flamingo: official 2.6.4 archive ↗
- WordPress: wp_mail return value ↗
- WP Mail SMTP: transport test ↗